Today's card idea comes from Jen Arkfeld's
Stamped Silly YouTube page.
I loved how simple and easy her video instructions were to duplicate. I
haven't done a lot of shaker cards before for fear of creating a
disaster in my stamp room with sequins falling everywhere. Well, I got
over that when a demo friend of mine did an adorable Easter shaker
card. So I went to YouTube to find a shaker card that I would enjoy
duplicating and creating with my Club members. Jen Arkfeld gives a
different technique for creating shaker cards using Fun Foam. I shared
this technique with my Club members but I also showed them how to do a
shaker card using Stampin' Up!'s Shaker Foam. To be sure I was able to
show my Club members how to duplicate this card, I had my 6-year old
daughter create a shaker card along side of me. She did all the
stamping, cutting, and putting together all the layers herself. I think
she did a fabulous job for a 6-year old!
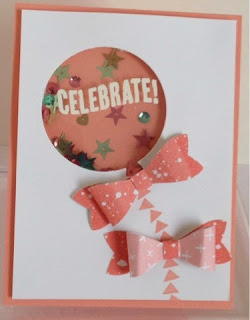 |
| Shaker Card with 2 bows |
How To Make a Shaker Card Using Stampin' Up!'s Shaker Foam:
- Cut your card base as you normally would in Crisp Cantaloupe or Coastal Cabana in these pictures.
- Cut a top layer out of Whisper White or other color if you prefer. I usually cut my top layer at 4" x 5 1/4".
- Cut out your balloon using your Big Shot and the Balloon Framelits.
Be sure to put your balloon framelit toward the top center but not too
close that you can't adhere your card layer to the card base.
- Stamp the balloon tail in the same color as your card base using the Celebrate Today stamp set.
- Stamp on a 3” x 3 ¼”
piece of Window Sheet using Staz On White ink. Tip: I think it is
easier to attach the Window Sheet to the back of your Whisper White
layer and stamping inside the balloon. This allows you to center your
wording inside the center of the balloon. Let the stamped wording dry
for a few minutes.
- Adhere another 3” x 3 ¼” piece of Window Sheet to your card base where your balloon will fall on your card.
- Cut and add the Shaker Foam to the Window Sheet on the outside of
where your balloon will fall on your card. Tip: Use a pencil or pen to
make marks on your Window Sheet or card base where the outlines of your
balloon will be. This way you will not be able to see the Shaker Foam
once you adhere your Whisper White layer.
- Add sequins of any color or type to the Window Sheet inside the
Shaker Foam area. I used the In Color Sequins for my card and my
daughter used the retired snowflake/silver sequins from the 2014 Holiday
Catalog. Tip: Jen Arkfeld gives a great tip on how to make it look
like your sequins don't fall to the bottom of your shaker. You glue a
few sequins on randomly before adding your sequins to the shaker foam
area. Give her video a look to get the full effect.
- Remove the adhesive from the Shaker Foam and add dimensionals to
your Whisper White layer in the four corners and near the middle of your
card under the balloon. Add the Whisper White layer to the Shaker Foam
adhesive and your card base to complete your card.
- Jen Arkfeld had a great idea of adding a bow using Stampin' Up!'s
Bow Builder Punch. I did this with my Club members and even added two
bows to one of my shaker cards. They absolutely loved how their cards
turned out! So give it a try. I promise it is a lot easier than you
think.
|
|
| My daughter made this card. You can see a bit of the shaker foam but she did a good job. |
Ingredients:
- Paper
- Coastal Cabana or Crisp Cantaloupe – 4 ¼” x 11” (scored at 5 ½”)
- Whisper White – 4” x 5 ¼”
- Window Sheets – 3” x 3 ¼”
- Irresistibly Yours Speciality DSP (SAB) – scraps to punch out the pieces for the bow
- Ink
- Coastal Cabana
- Crisp Cantaloupe
- Accessories
- Balloon Framelits
- Shaker Foam
- In Color Sequins
- Glue Dots


No comments:
Post a Comment